Battle of Midway
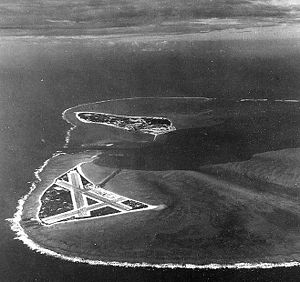
The Battle of Midway was a naval battle in the Pacific Theater of World War II. It took place from June 4, 1942 to June 7, 1942, approximately one month after the Battle of the Coral Sea, about five months after the Japanese capture of Wake Island, and six months after the Empire of Japan's attack on Pearl Harbor that had led to a formal state of war between the United States and Japan. During the battle, the United States Navy defeated a Japanese attack against Midway Atoll (located northwest of Hawaii) and destroyed four Japanese aircraft carriers and a heavy cruiser while losing a carrier and a destroyer.
The battle was a decisive victory for the Americans, widely regarded as the most important naval engagement of World War II[1] The battle permanently weakened the Imperial Japanese Navy (IJN), particularly through the loss of over 200 naval aviators.[2] Both nations sustained losses in the battle, but industrially outstripped by America, Japan was unable to reconstitute its naval forces while the American shipbuilding program provided quick replacements. Strategically, the U.S. Navy was able to seize the initiative in the Pacific and go on the offensive.
The Japanese plan of attack was to lure America's few remaining carriers into a trap and sink them.[3] The Japanese also intended to occupy Midway Atoll to extend Japan's defensive perimeter farther from its home islands. This operation was considered preparatory for further attacks against Fiji and Samoa, as well as the invasion of Hawaii.[4]
The Midway operation, like the attack on Pearl Harbor that had plunged the United States into war, was not part of a campaign for the conquest of the United States but was aimed at its elimination as a strategic Pacific power, thereby giving Japan a free hand in establishing its Greater East Asia Co-Prosperity Sphere. It was also hoped that another defeat would force the U.S. to negotiate an end to the Pacific War with conditions favorable for Japan.[5]
Strategic context
Japan had been highly successful in rapidly securing its initial war goals, including takeover of the Philippines, capture of Malaya and Singapore, and securing vital resource areas in Java, Borneo, and other islands of Indonesia (then the Dutch East Indies). As such, preliminary planning for a second phase of operations commenced as early as January 1942. However, because of strategic differences between the Imperial Army and Imperial Navy, as well as infighting between the Navy's GHQ and Admiral Isoroku Yamamoto’s Combined Fleet, the formulation of effective strategy was hampered, and the follow-up strategy was not finalized until April 1942.[6] Admiral Yamamoto succeeded in winning a bureaucratic struggle, placing his operational concept—the operations in the Central Pacific—ahead of other contending plans. These included operations either directly or indirectly aimed at Australia and into the Indian Ocean. In the end, Yamamoto's barely-veiled threat to resign unless he got his way succeeded in carrying his agenda forward.[7]
Yamamoto's primary strategic concern was the elimination of America's remaining carrier forces. This concern was acutely heightened by the Doolittle Raid on Tokyo (April 18, 1942) by USAAF B-25s staging off the carrier USS Hornet. The raid, while militarily negligible, was a severe psychological shock to the Japanese and proved the existence of a gap in the defenses around the Japanese home islands.[8] Sinking America's aircraft carriers and seizing Midway, the only strategic island besides Hawaii in the East Pacific, was seen as the only means of nullifying this threat. Yamamoto reasoned that an operation against the main carrier base at Pearl Harbor would induce the U.S. forces to fight. However, given the strength of American land-based airpower on Hawaii, he judged that the powerful American base could not be attacked directly.[9] Instead, he selected the atoll of Midway, at the extreme northwest end of the Hawaiian Island chain, some 1,300 miles (2,100 km) from Oahu. Midway was not especially important in the larger scheme of Japan's intentions; however, the Japanese felt that the Americans would consider Midway a vital outpost of Pearl Harbor and would therefore strongly defend it.[10] (Its ultimate value in the submarine war should not be ignored.)
Yamamoto's plan
Typical of Japanese naval planning during the Second World War, Yamamoto's battle plan was quite complex.[11] Additionally, his designs were predicated on optimistic intelligence information suggesting that USS Enterprise and USS Hornet, forming Task Force 16, were the only carriers available to the U.S. Pacific forces at the time. USS Lexington had been sunk and USS Yorktown severely damaged (and believed sunk) at the Battle of the Coral Sea] just a month earlier. Likewise, the Japanese were aware that USS Saratoga was undergoing repairs on the West Coast after taking torpedo damage from a submarine. As such, the Japanese believed they faced at most two American fleet carriers at the point of contact.
More important, however, was Yamamoto's belief that the Americans had been demoralized by their frequent defeats during the preceding six months. Yamamoto felt deception would be required to lure the U.S. Fleet into a fatally compromising situation.[12] To this end, he dispersed his forces so that their full extent (particularly his battleships) would be unlikely to be discovered by the Americans prior to battle. However, their emphasis on stealth and dispersal meant that none of their formations were mutually supporting, and any benefits from these tactics were neutralized by the fact that the United States had broken Japanese naval codes.
Critically, Yamamoto's supporting main body of battleships and cruisers would trail Vice-Admiral Chuichi Nagumo's carrier striking force by several hundred miles. Japan's heavy surface forces were intended to destroy whatever part of the U.S. Fleet might come to Midway's relief, once Nagumo's carriers had weakened them sufficiently for a daylight gun duel to be fought.[13] However, their distance from Nagumo's carriers would have grave implications during the battle, since most of the battleships could have provided valuable anti-aircraft coverage instead of being reserved for a surface duel that would never be fought. In addition, the battleships were escorted by cruisers, which possessed scout planes that would have been invaluable to Nagumo.[14]
Aleutian diversion
Likewise, the Japanese operations aimed at the Aleutian Islands (Operation AL) removed yet more ships from the force that would strike at Midway. However, whereas prior histories of the battle have often characterized the Aleutians operation as a feint to draw American forces northwards, recent scholarship on the battle has shown that according to the original Japanese battle plan, AL was designed to be launched simultaneously with the attack on Midway.[15] However, a 1-day delay in the sailing of Nagumo's task force had the effect of initiating Operation AL a day before its counterpart.[16] In any event, Operation AL was a misguided expenditure of offensive assets better applied in the central Pacific.
Prelude to battle
U.S. forces

In order to do battle with an enemy force anticipated to be composed of 4-5 carriers, Commander in Chief, Pacific Ocean Areas Chester W. Nimitz needed every available U.S. flight deck. He already had Vice Admiral William Halsey's two-carrier task force at hand—but Halsey was stricken with psoriasis and had to be replaced with Rear Admiral Raymond A. Spruance (Halsey's escort commander).[17] Nimitz also hurriedly called back Rear Admiral Frank Jack Fletcher's task force from the South West Pacific Area. They reached Pearl Harbor just in time to provision and re-sortie. USS Saratoga was still under repair, and USS Yorktown had been severely damaged at the Battle of the Coral Sea, but Pearl Harbor Naval Shipyard worked around the clock to patch up the carrier. Though several months of repairs at Puget Sound Naval Shipyard was estimated for the Yorktown, 72 hours was enough to restore her to a battle-worthy (if still structurally compromised) aircraft carrier.[18] Her flight deck was patched, whole sections of internal beams were cut out and replaced, and several new squadrons (drawn from Saratoga) were put aboard her. Admiral Nimitz showed disregard for established procedure in getting his third and last available carrier ready for battle—repairs continued even as Yorktown sortied, with work crews from the repair ship USS Vestal—which was still damaged from the raid on Pearl Harbor six months earlier—still aboard. Just three days after pulling into drydock at Pearl Harbor, the ship was again under steam, as the ship's band played "California, Here I Come."[19]
Japanese forces
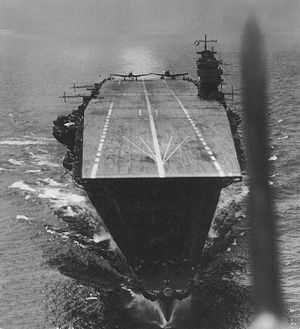
Meanwhile, as a result of their participation in the Battle of the Coral Sea, the Japanese aircraft carrier Zuikaku was in port in Kure (near Hiroshima), waiting for an air group to be brought to her to replace her destroyed planes. The heavily damaged Shōkaku was awaiting further repairs; she had suffered three bomb hits at Coral Sea and required months in drydock. Despite the likely availability of sufficient aircraft between the two ships to re-equip Zuikaku with a composite air group, the Japanese made no serious attempt to get her into the forthcoming battle.[20] Consequently, instead of bringing five intact heavy carriers into battle, Admiral Nagumo would now only have four: Kaga, with Akagi, forming Division 1; Hiryū and Sōryū, as the 2nd Division. At least part of this was a product of fatigue; Japanese carriers had been constantly on operations since December 7, 1941, including pinprick raids on Darwin and Colombo.
Japanese strategic scouting arrangements prior to the battle also fell into disarray. A picket line of Japanese submarines was late getting into position (partly because of Yamamoto's haste), which let the American carriers proceed to their assembly point northeast of Midway (known as "Point Luck") without being detected.[21] A second attempt to use 4-engine reconnaissance seaplanes to scout Pearl Harbor prior to the battle (and thereby detect the absence or presence of the American carriers), known as "Operation K," was also thwarted when Japanese submarines assigned to refuel the search aircraft discovered that the refueling point—a hitherto deserted bay off French Frigate Shoals—was occupied by American warships (because the Japanese had carried out an identical mission in March).[22] Thus, Japan was deprived of any knowledge concerning the movements of the American carriers immediately before the battle. Japanese radio intercepts also noticed an increase in both American submarine activity and U.S. message traffic. This information was in Yamamoto's hands prior to the battle. However, Japanese operational plans were not changed in reaction to this.[23]
American and British code-breaking
Admiral Nimitz had one priceless asset: American and British cryptanalysts had broken the JN-25 naval code. Commander Joseph Rochefort and his team at HYPO were able to confirm Midway was the target of the impending Japanese strike and to provide Nimitz with a complete IJN order of battle. Japan's efforts to introduce a new codebook were delayed, giving HYPO crucial days; they were blacked out shortly before the attack began.[24] As a result, the Americans entered the battle with a very good picture of where, when, and in what strength the Japanese would appear. Nimitz was aware, for example, that the vast numerical superiority of the Japanese fleet had been divided into no less than four task forces, and the escort for the main Carrier Striking Force was limited to just a few fast ships. For this reason, they knew the anti-aircraft guns protecting the carriers would be limited. Knowing the strength he faced, Nimitz calculated three carrier decks, plus Midway, to Yamamoto's four gave him rough parity. The Japanese, by contrast, remained almost totally in the dark about their opponents even after the battle began.[25]
Battle
Initial air attacks
Vice Admiral Chuichi Nagumo launched his initial attack wave of 108 aircraft at 04:30 on June 4. At the same time, he launched seven search aircraft (one of which was launched 30 minutes late), as well as combat air patrol (CAP) fighters. Japanese reconnaissance arrangements were flimsy, with too few aircraft to adequately cover the assigned search areas, which were laboring under poor weather conditions to the northeast and east of the task force.[26]
At 06:20, Japanese carrier aircraft bombed and heavily damaged the U.S. base on Midway. Midway-based Marine fighter pilots, flying obsolescent Grumman F4F Wildcats and obsolete Brewster F2As, made a defense of Midway and suffered major losses. American anti-aircraft fire was accurate and intense, damaging many Japanese aircraft.[27] The Japanese mission recognized that the island's strike aircraft had already departed. The Japanese strike leader signaled Nagumo that another mission would be necessary to neutralize the island's defenses before troops could be landed on June 7.[28]
Having taken off prior to the Japanese attack, American bombers based on Midway made several attacks on the Japanese carrier fleet. These included six TBF Avengers in their first combat operation, and four B-26 Marauders (armed with torpedoes). The Japanese shrugged off these attacks with almost no losses, while destroying all but three of the American bombers.[29]
Admiral Nagumo, in accordance with Japanese carrier doctrine at the time, had kept half of his aircraft in reserve. These comprised two squadrons each of dive-bombers and torpedo bombers. The latter were armed with torpedoes for an antiship strike, should any American warships be located. The dive bombers were, as yet, unarmed.[30] As a result of the attacks from Midway, as well as the morning flight leader's recommendation regarding the need for a second strike, Nagumo at 07:15 ordered his reserve planes to be re-armed with general purpose contact bombs for use on land targets. This had been underway for about 30 minutes, when at 07:40 a scout plane from the cruiser Tone signaled the discovery of a sizable American naval force to the east. Nagumo quickly reversed his order and asked the scout plane to ascertain the composition of the American force. Another 40 minutes elapsed before Tone's scout finally detected and radioed the presence of a single carrier in the American force (TF 16, the other carrier was not detected).[31]
Nagumo was now in a quandary. Rear Admiral Tamon Yamaguchi, leading Carrier Division 2 (Hiryū and Sōryū), recommended Nagumo strike immediately with the forces at hand. Nagumo had an opportunity to immediately launch some or all of his reserve force against the American ships[32] but had to act quickly because his Midway strike force would be returning shortly. They would be low on fuel and carrying wounded crewmen, and they would need to land promptly. Spotting his flight decks and launching aircraft would require at least 30–45 minutes to accomplish.[33] Furthermore, by spotting and launching immediately, he would be committing some of his reserve to battle without proper anti-ship armament. Japanese carrier doctrine preferred fully constituted strikes, and in the absence of a confirmation (until 08:20) of whether the American force contained carriers, Nagumo's reaction was cautious.[34] In addition, the impending arrival of another American air strike at 07:53 gave weight to the need to attack the island again. In the end, Nagumo chose to wait for his first strike force to land, then launch the reserve strike force, which would have by then been properly armed and ready.[35]
Attacks on the Japanese fleet
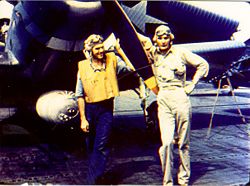
Meanwhile, the Americans had already launched their carrier aircraft against the Japanese. Admiral Fletcher, in overall command on board Yorktown, and armed with PBY sighting reports from the early morning, ordered Spruance to launch against the Japanese as soon as was practical. At the urging of Halsey's Chief of Staff, Captain Miles Browning, Spruance commenced launching from his carriers Enterprise and Hornet at 07:00. Fletcher, upon completing his own scouting flights, followed suit at 08:00 from Yorktown.[36] However, American flight deck operations were not nearly as proficient as their enemy's at this point in the war, and the American squadrons were launched in piecemeal fashion, proceeding to the target in several different groups. This diminished the overall impact of the American attacks and greatly increased their casualties, although it later had the effect of splitting the Japanese defenses.
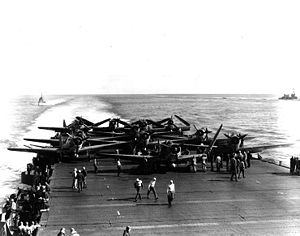
American carrier aircraft began attacking the Japanese carrier fleet at 09:20, with first Torpedo Squadron 8 (VT-8), followed by VT-6 (at 09:40).[37] Every TBD Devastator of VT-8 was shot down, with only one of the aircrew surviving. VT-6 met nearly the same fate, with no hits against the enemy to show for their efforts. The Japanese CAP, flying the much faster Mitsubishi Zero fighter, made short work of the Americans who not only had no fighter support of their own but were flying the slow, under-armed TBD Devastator torpedo planes. However, despite their terrible sacrifices, the American torpedo planes indirectly achieved three important results. First, they kept the Japanese carriers off balance, with no ability to prepare and launch their own counterstrike. Second, their attacks had pulled the Japanese combat air patrol out of position—not in terms of altitude (as has commonly been described), but by laterally distorting the CAP coverage over the Japanese fleet. Third, many of the Zeros were low on ammunition and fuel.[38] The appearance of a third torpedo plane attack from the SE by VT-3 at 10:00 very quickly drew the majority of the Japanese CAP into the southeast quadrant of the fleet.[39]
By chance, at the same time VT-3 was sighted by the Japanese, two separate formations (comprising three squadrons total) of American SBD Dauntless dive-bombers were approaching the Japanese fleet from the northeast and southwest. These formations initially had difficulty in locating the Japanese carriers, and their fuel was running low. However, by the decision by squadron commanders C. Wade McClusky, Jr. and Max Leslie to continue the search, they spotted the wake of Japanese destroyer Arashi. The destroyer was steaming at full speed back to Nagumo's carrier force, after having unsuccessfully depth-charged the U.S. submarine Nautilus (SS-168), which had earlier carried out an unsuccessful attack on the battleship Kirishima.[40] The American dive-bombers arrived in a perfect position to attack the Japanese.[41] Armed Japanese strike aircraft filled the hangar decks at the time of the fateful attack, fuel hoses were snaking across the decks as refueling operations were hastily completed, and the constant change of ordnance meant that bombs and torpedoes were stacked around the hangars rather than being stowed safely in the magazines.[42] The Japanese carriers were in an extraordinarily vulnerable position.
However, contrary to some accounts of the battle, recent research has demonstrated that the Japanese were not prepared to launch a counterstrike against the Americans at the time they were decisively attacked.[43] Because of the constant flight deck activity associated with combat air patrol operations during the preceding hour, the Japanese had never had an opportunity to spot their reserve strike force for launch. The few aircraft on the Japanese flight decks at the time of the attack were either CAP fighters, or (in the case of Sōryū) strike fighters being spotted to augment the CAP.[44] Regardless, the moment of opportunity was exploited for all it was worth by the American bomber pilots.
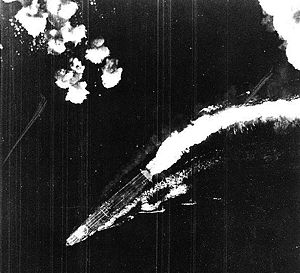
Beginning at 10:22, Enterprise’s aircraft attacked Kaga, while to the south, Yorktown’s aircraft attacked carrier Sōryū, with Akagi being struck by several of Enterprise's bombers four minutes later. Simultaneously, VT-3 was targeting Hiryū, although the American torpedo aircraft again scored no hits. The dive-bombers, however, had better fortune. Within six minutes, the SBDs made their attack runs and left all three of their targets heavily ablaze. Akagi was hit by just one bomb, which was sufficient; it penetrated to the upper hangar deck and exploded among the armed and fueled aircraft there. One extremely near miss also slanted in and exploded underwater, bending the flight deck upward with the resulting geyser and causing crucial rudder damage.[45] Sōryū took three bomb hits in the hangar decks; Kaga took at least four and likely more. All three carriers were out of action and would eventually be abandoned and scuttled.[46] Subsequent to the air attacks, the Nautilus fired torpedoes at what her crew thought was the Sōryū but which later research suggests was the Kaga. The Nautilus crew claimed that one torpedo hit the carrier, causing "flames." However, the surviving crew of the Kaga reported no torpedo hits after the air attack. Of the four torpedoes launched, one failed to run, two ran erratically, and the fourth was a 'dud,' impacting amidships and breaking in half.[47]
Japanese counterattacks
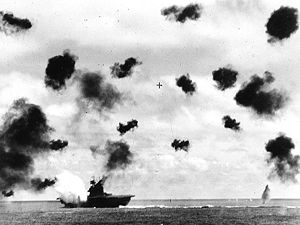
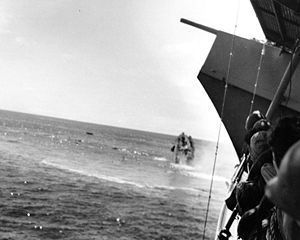
Hiryū, the sole surviving Japanese aircraft carrier, wasted little time in counterattacking. The first strike of Japanese dive-bombers badly damaged Yorktown with two bomb hits, yet her damage control teams patched her up so effectively (in about an hour) that the second strike of torpedo bombers mistook her for an intact carrier. Despite Japanese hopes to even the battle by eliminating two carriers with two strikes, Yorktown absorbed both Japanese attacks, the second wave of attackers believing mistakenly that Yorktown had already been sunk and that they were attacking Enterprise. After two torpedo hits, Yorktown lost power and was now out of the battle, forcing Admiral Fletcher to move his flag to the heavy cruiser Astoria, but Task Force 16's two carriers had escaped undamaged as a result.
News of the two strikes, with the reports that each had sunk an American carrier, greatly improved the morale of the crewmen of the Carrier Striking Force. The surviving aircraft from all four aircraft carriers in the Carrier Striking Force landed on Hiryū. There they were prepared for a strike against what was believed to be the only remaining aircraft carrier of the American fleet.
When American scout aircraft subsequently located Hiryū later in the afternoon, Enterprise and Yorktown launched a final strike of dive bombers against the last Japanese carrier that left her ablaze, despite being defended by a strong defensive CAP of over a dozen Zero fighters. Rear Admiral Tamon Yamaguchi chose to go down with his ship. Hornet's strike, launching late because of a communications error, concentrated on the remaining surface ships but failed to score any hits.
As darkness fell, both sides took stock and made tentative plans for continuing the action. Admiral Fletcher, obliged to abandon the derelict Yorktown and feeling he could not adequately command from a cruiser, ceded operational command to Spruance. Spruance knew that the United States had won a great victory, but he was still unsure of what Japanese forces remained at hand and was determined to safeguard both Midway and his carriers. Consequently, he decided to retire east during the evening, so as to not run into a night action with Japanese surface forces that might still be in the area. In the early morning hours, he returned to the west to be in a position to cover Midway should an invasion develop in the morning.[48]
For his part, Yamamoto initially decided to continue the effort and sent his remaining surface forces searching eastward for the American carriers. Simultaneously, a cruiser raiding force was detached to bombard the island that very night. Eventually, however, the night passed without any sign of the Americans, and at 02:55 Yamamoto ordered his various forces to retire to the west.[49]
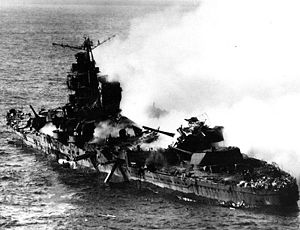
While beating its retreat in close column at night, the Japanese cruiser bombardment force suffered a further trial. A sighting of the American submarine Tambor forced the cruiser formation to initiate radical evasive manoeuvers. Mogami failed to adjust her course correctly for a column turn and rammed the port quarter of her sister ship Mikuma. Over the following two days, first Midway and then Spruance's carriers launched several successive strikes against the stragglers. Mikuma was eventually sunk, while Mogami survived severe damage to return home for repairs. U.S. Marine Captain Richard E. Fleming was posthumously awarded the Medal of Honor for his attack on Mikuma.
Yorktown was sunk during salvage efforts, by three torpedoes from Japanese submarine I-168 on June 7. There were few casualties since most of the crew had already been evacuated. One torpedo from that salvo also sank the destroyer USS Hammann, which had been providing auxiliary power to Yorktown, splitting her in two with the loss of 80 lives.
Aftermath
After scoring a clear victory, American forces retired. Japan's loss of four out of their six fleet carriers, plus a large number of their highly trained aircrews, stopped the expansion of the Japanese Empire in the Pacific. Only Zuikaku and Shōkaku were left available for offensive actions. The other carriers that Japan possessed, Ryūjō, Junyo, and Hiyo, were light carriers that had small airwings and comparatively poor survivability compared to fleet carriers. This major defeat for Japan came six months after the beginning of open warfare against the United States. That is almost exactly the maximum amount of time that Admiral Isoroku Yamamoto predicted he would have the advantage over the enemy before the tide would turn in America's favor.
Allegations of war crimes
Three U.S. airmen, Ensign Wesley Osmus (pilot, Yorktown), Ensign Frank O'Flaherty (pilot, Enterprise) and Aviation Machinist's Mate B. F. (or B. P.) Gaido (radio-gunner of O'Flaherty's SBD) were captured by the Japanese during the battle. Osmus was held on the destroyer Arashi, with O'Flaherty and Gaido on the cruiser Nagara (or destroyer Makigumo, sources vary), and it is alleged that they were later killed.[50] The report filed by Admiral Nagumo states of Ensign Osmus: "[H]e died on 6 June and was buried at sea." The report does not mention the death of O'Flaherty or Gaido.[51] The practice of burying the remains of the enemy at sea was common among all navies involved.
Impact
Although the battle has often been called "the turning point of the Pacific," it clearly did not win the Pacific War overnight for the Americans.[52] The Japanese navy continued to fight ferociously, and it was many more months before the U.S. moved from a state of naval parity to that of increasingly clear supremacy.[53] Thus, Midway was not "decisive" in the same sense as Salamis or Trafalgar. However, victory at Midway gave the U.S. the opportunity to seize the strategic initiative, inflicted irreparable damage on the Japanese carrier force, and shortened the war in the Pacific.[54]
Just two months later, the US took the offensive and attacked Guadalcanal, catching the Japanese off-balance. (Had there been a defeat at Midway, the U.S. might not have struck at such an early date or had the same degree of success.) Securing Allied supply lines to Australia and the Indian Ocean in this time frame, along with the heavy attrition inflicted on the Japanese during the Guadalcanal campaign, had far-reaching effects on the course of the war. Its effect on the length is debatable, given that the Pacific Fleet's Submarine Force had essentially brought Japan's economy to a halt by January 1945.[55]
Midway dealt Japanese naval aviation a heavy blow. The pre-war Japanese training program produced pilots of exceptional quality but at a slow rate.[56] This small group of elite aviators were combat hardened veterans. At Midway, the Japanese lost as many of these pilots in a single day as their pre-war training program produced in a year.[57] In the subsequent battles around Guadalcanal in late 1942, such as Eastern Solomons and Santa Cruz, Japanese naval aviation was ground down by attrition despite roughly equal losses on both sides; Japanese planners failed to foresee a long continuous war, and consequently their production failed to replace the losses of ships, pilots, and sailors. Although wartime Japanese training programs produced pilots, they were insufficiently trained as the war continued, an imbalance that became worse as increasingly potent U.S. fighters became available that outmatched Japanese aircraft. By mid-1943, the losses at Midway and in the Solomons had decimated Japanese naval aviation.[58] Worse for the Japanese, their habit of leaving expert pilots in combat was detrimental to the training of their forces. The U.S. Navy, by contrast, rotated its best aviators home on a regular basis to teach pilot trainees the techniques they would use to defeat Japan.
Even more important was the irredeemable loss of four of Japan's fleet carriers.[59] These ships were not replaced, unit for unit, until early in 1945. (Shinano, commissioned on November 19, 1944, was only the fourth fleet carrier commissioned by Japan during the war, after Taihō, Unryū, and Amagi.) In the same span of time, U.S. industrial capacity allowed the U.S. Navy to commission more than two dozen fleet and light fleet carriers, and numerous escort carriers.[60] Thus, Midway permanently damaged the Japanese Navy's striking power and measurably shortened the period during which the Japanese carrier force could fight on advantageous terms. The loss of operational capability during this critical phase of the campaign ultimately proved disastrous; Imperial Japan could have executed much grander, and perhaps more successful, operations against the U.S. counter-offensive being marshaled.
The importance of the Battle of Midway can also be assessed by considering the hypothetical scenario of an American defeat and the destruction of the U.S. aircraft carrier fleet. With only two carriers (USS Saratoga]] and USS Wasp) available, the U.S. would have been forced onto the strategic defensive for at least the remainder of 1942. The Japanese could have continued their advance on the New Hebrides and cut off communication with Australia, and completed their conquest of New Guinea. Furthermore, a catastrophic failure at Midway might have resulted in the removal of key figures like Nimitz and Spruance from their positions. Offensive operations in the Pacific might have been delayed until as late as mid-1943, when Essex and Independence-class carriers became available in appreciable numbers.
A hypothetically longer Pacific War does raise the question of the role the Soviet Union would have played in Japan's demise, and whether the USSR would have gained a postwar presence in a partitioned Japan, similar to Germany. The actual implications of an American defeat are unknowable, but there is little question losing at Midway would have narrowed U.S. options dramatically, at least in the short term.[61] A defeat at Midway, by implicitly jeopardizing Hawaii and Pearl Harbor, might have put the "Germany First" priority of President Franklin D. Roosevelt and the Joint Chiefs in grave political peril.[62] Had the United States been obliged to focus its efforts on Japan, American intervention in Europe might well have been delayed, with incalculable implications for Germany and the Soviet Union.
Discovery
U.S. vessels
Because of the extreme depth of the ocean in the area of the battle (more than 17,000 feet/5200 m), researching the battlefield has presented extraordinary difficulties. However, on May 19, 1998, Robert Ballard and a team of scientists and Midway veterans (including Japanese participants) located and photographed Yorktown. The ship was remarkably intact for a vessel that sank in 1942; much of the original equipment and even the original paint scheme were still visible.
Japanese vessels
Ballard's subsequent search for the Japanese carriers was ultimately unsuccessful. In September 1999, a joint expedition between Nauticos Corp. and the U.S. Naval Oceanographic Office searched for the Japanese aircraft carriers. Using advanced re-navigation techniques in conjunction with the ship's log of the submarine USS Nautilus, the expedition located a large piece of wreckage, which was subsequently identified as having come from the upper hangar deck of carrier Kaga.[63] The main wreck, however, has yet to be located.
In film
The Battle of Midway has been featured in several motion pictures. The first film about the battle was directed by John Ford, who used color motion picture from U.S. Navy of the actual battle, releasing an Academy Award winning documentary called The Battle of Midway in 1942.
Subsequently, the movie Midway, directed by Jack Smight, was released in 1976. This film generally portrayed the events fairly accurately, although it was criticized for suffering from several flaws, including a preposterous romance between a young American aviator and a Japanese American, the presence of American F4U Corsair fighters (which were not operational at the time of the battle), inaccurate warship models, and the promotion of Hypo's Commander Rochefort to Fleet Intelligence Officer. In addition, the 1976 movie vividly depicts Grumman F6F Hellcat carrier landings, whereas the battle involved its predecessor, the Grumman F4F Wildcat, which resembles the Hellcat but is distinguishable during landings due to the Wildcat's narrow-track landing gear. The Hellcat did not become operational until 1943. The 1976 movie reused numerous battle scenes previously filmed for Tora! Tora! Tora! and was heavily criticized for this.
| Military of the United States Portal |
Notes
- ↑ U.S. Navy, A Brief History of Aircraft Carriers: Battle of Midway. Retrieved February 9, 2009.
- ↑ Dull, The Imperial Japanese Navy: A Battle History, 166.
- ↑ H.P. Willmott, Barrier and the Javelin.
- ↑ Parshall & Tully, 43-45.
- ↑ Parshall & Tully, Shattered Sword, 33.
- ↑ Prange, Miracle at Midway, 13-15, 21-23.
- ↑ Parshall & Tully, Shattered Sword, 33.
- ↑ Prange, Miracle at Midway, 22-26.
- ↑ Parshall & Tully, Shattered Sword, 33.
- ↑ Willmott, Barrier and the Javelin, 66-67.
- ↑ Prange, Miracle at Midway, 375-379.
- ↑ Parshall & Tully, Shattered Sword, 53.
- ↑ Parshall & Tully, Shattered Sword, 51, 55.
- ↑ Willmott, Barrier and the Javelin.
- ↑ Parshall & Tully, Shattered Sword, 43-45.
- ↑ Parshall & Tully, Shattered Sword, 43-45.
- ↑ Prange, Miracle at Midway, 80-81.
- ↑ Cressman et al., A Glorious Page in Our History, 37-45.
- ↑ Lord, Incredible Victory, 39.
- ↑ Parshall & Tully, Shattered Sword, 65-67.
- ↑ Willmott, Barrier and the Javelin, 351.
- ↑ Lord, Incredible Victory, 37-39.
- ↑ Parshall & Tully, Shattered Sword, 102-104.
- ↑ Holmes, Double-Edged Secrets.
- ↑ Lord, Incredible Victory.
- ↑ Parshall & Tully, Shattered Sword, 107-112.
- ↑ Parshall & Tully, Shattered Sword, 200-204.
- ↑ Lord, Incredible Victory, 110.
- ↑ Prange, Miracle at Midway, 207-212.
- ↑ Parshall & Tully, Shattered Sword, 130-132.
- ↑ Prange, Miracle at Midway, 216-217.
- ↑ Parshall & Tully, Shattered Sword, 165-170.
- ↑ Parshall & Tully, Shattered Sword, 121-124.
- ↑ Prange, Miracle at Midway, 217-218, 372-373.
- ↑ Prange, Miracle at Midway, 231-237.
- ↑ Cressman et al., A Glorious Page in Our History, 84-89.
- ↑ Cressman et al., A Glorious Page in Our History, 91-94.
- ↑ Parshall & Tully, Shattered Sword, 215-216; 226-227.
- ↑ Parshall & Tully, Shattered Sword, 226-227.
- ↑ Combined Fleet, IJN KIRISHIMA: Tabular Record of Movement. Retrieved February 9, 2009.
- ↑ Prange, Miracle at Midway, 259-261, 267-269.
- ↑ Parshall & Tully, Shattered Sword, 250.
- ↑ Parshall & Tully, Shattered Sword, 229-231.
- ↑ Parshall & Tully, Shattered Sword, 231.
- ↑ Shattered Sword, 253-354; 256-259.
- ↑ Shattered Sword, 330-353.
- ↑ Lord, Incredible Victory, 213.
- ↑ Prange, Miracle at Midway, 324.
- ↑ Prange, Miracle at Midway, 320.
- ↑ Robert E. Barde, "Midway: Tarnished Victory," Military Affairs 47 (4) (December 1983): 188-192.
- ↑ Ibiblio.org, Japanese Story of the Battle of Midway. Retrieved February 9, 2009.
- ↑ Prange, 395.
- ↑ Willmott, Barrier and the Javelin, 522-523.
- ↑ U.S. Naval War College Analysis, 1.
- ↑ Blair, Silent Victory.
- ↑ Peattie, Sunburst: The Rise of Japanese Naval Air Power, 1909-1941, 181-184, 191-192.
- ↑ Peattie, Sunburst, 131-134.
- ↑ Peattie, Sunburst, 176-186.
- ↑ Parshall & Tully, Shattered Sword, 416-421.
- ↑ Hazegray, listing of all American carriers commissioned during the war. Retrieved February 9, 2009.
- ↑ Willmott, Barrier and the Javelin, 519-523.
- ↑ Weinberg, World at Arms, 339.
- ↑ Parshall & Tully, Shattered Sword, 491-493.
ReferencesISBN links support NWE through referral fees
- Cook, Theodore F., Jr. "Our Midway Disaster." In Robert Cowley (ed.). What if? London: Macmillan, 2000. ISBN 0333751833
- Fuchida, Mitsuo, and Masatake Okumiya. Midway: The Battle that Doomed Japan, the Japanese Navy's Story. Annapolis, MD: United States Naval Institute Press, 1955. ISBN 0870213725
- Hanson, Victor D. Carnage and Culture: Landmark Battles in the Rise of Western Power. Doubleday, 2001. ISBN 0385500521
- Hara, Tameichi. Japanese Destroyer Captain. 1961. ISBN 0345278941
- Kahn, David. The Codebreakers: The Comprehensive History of Secret Communication from Ancient Times to the Internet. Scribner. ISBN 0684831309
- Kernan, Alvin. The Unknown Battle of Midway. Yale University Press, 2005. ISBN 030010989X
- Lord, Walter. Incredible Victory. Buford, 1967. ISBN 1580800599
- Lundstrom, John B. First Team And the Guadalcanal Campaign: Naval Fighter Combat from August to November 1942. Naval Institute Press, 2005. ISBN 1591144728
- Morison, Samuel E. Coral Sea, Midway and Submarine Actions: May 1942–August 1942. History of United States Naval Operations in World War II, 1949.
- Parshall, Jonathan, and Tully, Anthony. 2005. Shattered Sword: The Untold Story of the Battle of Midway. Dulles, VA: Potomac Books, 1949. ISBN 1574889230
- Prange, Gordon W., and Donald M. Goldstein, Katherine V. Dillon. 1982. Miracle at Midway. McGraw-Hill, 1949. ISBN 0070506728
- Weinberg, Gerhard L. A World at Arms: A Global History of World War II. Cambridge U P, 2005. ISBN 978-0521618267
- Wilmott, H.P. 1983. The Barrier and the Javelin. United States Naval Institute Press. ISBN 1591149495
External links
All links retrieved September 22, 2023.
- The Japanese Story of the Battle of Midway, according to US Naval Intelligence.
- Battle of Midway Movie (1942) - US Navy propaganda film directed by John Ford.
- The Battle of Midway (1942) at the Internet Movie Database
- WW2DB: The Battle of Midway
- Midway Chronology
|
Western Europe · Eastern Europe · China · Africa · Mediterranean · Asia and the Pacific · Atlantic | |||||
|
Major participants |
Timeline |
Aspects | |||
|
Principal co-belligerents in italics. |
Prelude 1939 1940 1941 1942 |
1943 1944 1945 • more military engagements Aftermath |
• Attacks on North America Civilian impact and atrocities | ||
| Allies | Axis | ||||
|
at war from 1937 entered 1939 entered 1940 |
entered 1941 entered 1942 entered 1943 entered 1944 • others |
at war from 1937 entered 1939 entered 1940 entered 1941 entered 1942 • others | |||
| Resistance movements Austria · Baltic1 · Czechoslovakia · Denmark · Ethiopia · France · Germany · Greece · Italy · Jewish · Netherlands · Norway · Poland · Thailand · USSR · Ukraine2 · Vietnam · Yugoslavia · others | |||||
|
1 Anti-Soviet. | |||||
Credits
New World Encyclopedia writers and editors rewrote and completed the Wikipedia article in accordance with New World Encyclopedia standards. This article abides by terms of the Creative Commons CC-by-sa 3.0 License (CC-by-sa), which may be used and disseminated with proper attribution. Credit is due under the terms of this license that can reference both the New World Encyclopedia contributors and the selfless volunteer contributors of the Wikimedia Foundation. To cite this article click here for a list of acceptable citing formats.The history of earlier contributions by wikipedians is accessible to researchers here:
The history of this article since it was imported to New World Encyclopedia:
Note: Some restrictions may apply to use of individual images which are separately licensed.
