Battle of Kandahar
| Battle of Kandahar | |||||||
|---|---|---|---|---|---|---|---|
| Part of the Second Anglo-Afghan War | |||||||
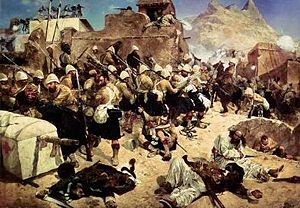
 92nd Highlanders at Kandahar Painted by Caton Woodville (1856-1927) | |||||||
| |||||||
| Combatants | |||||||
| Afghans | |||||||
| Commanders | |||||||
| Ayub Khan | |||||||
| Strength | |||||||
| 10,000 Anglo-Indian troops 32 guns |
12,800 tribal warriors 32 guns | ||||||
| Casualties | |||||||
| 36 Killed, 218 wounded | 1,000 Killed 1,500 wounded (approx) | ||||||
The Battle of Kandahar, September 1, 1880, represents the last major conflict of the Second Anglo-Afghan War. The battle in southern Afghanistan, fought between the British forces under command of General Roberts and the Afghan forces led by Ayub Khan, inflicted nearly 3,000 casualties in total. Although a decisive victory for the British, after the battle, Britain restored Afghanistan to its pre-war role as a neutral buffer state between India and Russia
Great Britain had become a dominant colonial power during the eighteenth and nineteenth centuries. "The sun never sets on the British empire" had been a true saying from the late 1820s. What fueled Britain's drive for empire is difficult to grasp. Possibly a sense of Providence, carrying "the white man's burden" to civilize the world, possibly, as Rudyard Kipling phrased it in his book, The White Man's Burden (1899). The British apparently saw themselves as superior to the so-called heathen people of India, China, Africa, the Middle East, and the Island Peoples. It appeared to them that God had chosen Britain to bring Christian civilization to them, with its laws, architecture, sports, education, values, and technology.
| Second Anglo-Afghan War |
|---|
| Siege of Sherpur - Ahmed Khel - Maiwand - Kandahar |
England had been working to check Russia's advance into India since since the early 1800s. The moves between Russia and England earned the name the Great Game. The Great Game erupted into three wars between Russia and England, with the Afghan people caught between: The First Anglo-Afghan War (1832-1840), the Second Anglo-Afghan War (1878-1881), and the Third Anglo-Afghan War (1917-1919). The Battle of Kandahar, proved a key battle that ended the war with a decisive British victory.
Background
In May 1879, after the death of the Amir Sher Ali Khan, Sir Louis Cavagnari negotiated and signed the Treaty of Gandamak with his successor, Yakub Khan. The treaty obliged the Afghans to admit a British resident at Kabul; a position Cavagnari himself took up in July. On the September 3, a sudden rising of Afghan troops massacred Cavagnari and the other European members of the mission.
After Yakub Khan had been dethroned and exiled for suspected collusion in the murder of Cavagnari, the British looked for two replacement candidates: His younger brother, Ayub Khan the Governor of Herat, and his nephew, Abdul Rahman Khan. In May 1880, a new British Liberal government recalled the Viceroy of India, Lord Lytton, from India and replaced him with Lord Ripon who had instructions to bring all troops out of Afghanistan. Ayub Khan, who after stirring up anti-British feeling, disrupted those plans for the evacuation by sallying out of Herat in early June with 10,000 followers.[1] The British sent a force of 1,500 with Indian troops, together with Afghan levies, to intercept that force.
The British, commanded by Brigadier George Burrows, met Ayub Khan at Maiwand, on July 27, 1880. Many of the Indian troops in British service, new and inadequately trained recruits, crumpled under pressure. The Afghan levies had already switched sides, unwilling to fight against their countrymen.[2] Despite a heroic last stand by the 66th Regiment, and inflicting 2,500 casualties on his enemy, the determined adversary defeated General Burrows.
Prelude
After the disastrous defeat at Maiwand, the remnants of General Burrows’ battle-wearied army began the forty five mile retreat to the city of Kandahar. Armed local irregulars, exhaustion, and thirst contributed to the break down of the column’s discipline. Captain Slade’s rear guard action alone allowed many more troops to reach refuge of the city:
All over the wide expanse of desert are to be seen men in twos and threes retreating. Camels have thrown their loads; sick men, almost naked, are astride donkeys, mules, and camels; the bearers have thrown down their dhoolies (palanquins) and left the wounded to their fate. The guns and carriages are crowded with the helpless wounded suffering the tortures of the damned; horses are limping along with ugly wounds and men are pressing eagerly to the rear in the hope of finding water. Hordes of irregular horsemen are to be seen amongst our baggage animals, relentlessly cutting our men down and looting. A few alone remain with Brigadier Burrows to try and turn the rout into an orderly retreat.[3]
Of the estimated 1,500 British and Indian troops at Maiwand, a little over 960 succumbed in either the battle or the ensuing retreat. Only 161 of the wounded reached the citadel of Kandahar.
The siege of Kandahar
The remnants of the straggling column reached Kandahar on the 28th, raising the garrison numbers to 4360. The British compelled the Afghan population of 12,000 to leave. With the abandonment of the cantonments, the whole garrison withdrew behind the walls of the fortified city and organized preparations for its defense. Those defenses included improving and facilitating communications along the cities’ walls, plugging breaches, constructing gun platforms and the laying of wire obstacles outside the walls to entangle their foe. The Afghans determined to harass and hinder the defenders’ preparations throughout.
On August 8, Ayub Khan, the victor at Maiwand, opened fire on the citadel from Picquet hill northwest of the city. A few days later, guns volleyed forth from the villages of Deh Khoja and Deh Khati on the east and south. Brigadier General Brooke, on the 16th, failed in an attempt to neutralize the village of Deh Khoja. During the extrication, both Brigadier General Brooke and Captain Cruickshank fell, adding to the casualty total of over 100.
Relief column
The Maiwand disaster had altered military plans for the evacuation of the Kabul garrison from Afghanistan.
…the present question is the relief of Kandahar and the defeat of Ayub. I have a fine force ready for the work, and Bobs would go in command of it.[4]
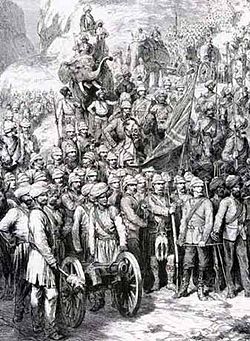
The "Bobs" in question, General Roberts, would personally lead a division from Kabul to rectify the recent calamity and relieve the besieged city of Kandahar. General Phayre would march from Quetta in northern India with the same intention, while General Stewart would proceed to evacuate the rest of the garrison back to India as originally planned. The Viceroy of Afghanistan received information that Roberts would march on August 8, with the expectation of reaching Kandahar by September 2.

Europeans accounted for a little more than 2800 of the 10,000 men under Robert’s command. Because of the unforgiving terrain of the Afghan country, and the necessity of speed, all troops traveled light (20-30 lbs of kit per trooper) and controversially, without wheeled transport or artillery. 8500 mules, donkeys, and ponies carried the main supplies.
The march from Kabul to Kandahar covers approximately 320 miles (although the Logar Valley route required traveling farther, the valley’s fertile land supplemented their supplies). The army paid for everything they took throughout the march including grain, fresh animals, and even firewood—the local Afghans more than pleased to barter with the troops.
After a brief stop at Ghazni, the column set off again early in the freezing morning of the 16th. By the end of the day’s march in the early afternoon, the temperatures had exceeded 100 °F, with scarcely any shade. Sore feet and the constant scarcity of water added to the extreme discomfort.
The method, of such marching as was now put in practice is not easy to describe; it combined the extreme of freedom in movement with carefully regulated halts, and the closest control in every portion of the column; it employed the individual intelligence of each man composing the masses in motion, and called on all for exertion in overcoming the difficulties of the march, in bearing its extraordinary toil, and in aiding the accomplishment of the object in view.[5]
By the 24th, the relief column had reached Khelat-i-Ghilzai. General Roberts received a letter from General Primrose at Kandahar describing the sortie in the village of Deh Khoja earlier on the 16th, and informing Roberts of the situation. On the 25th, after the garrison of Kelat-i-Ghilzai joined the relief column, they resumed the march towards Kandahar. General Phayre’s relief column, having suffered delays from his arduous trek, remained some distance from Kandahar.
The following day, General Roberts' relief force reached Tir Andaz. Roberts learned that Ayub Khan had lifted the siege of Kandahar and had retired north to the village of Mazra in the Urgundab valley. On the 27th, General Hugh Gough proceeded to Roberts with two cavalry regiments, while the remainder of the force, moving somewhat slower, joined them in Roberts, on the 28th, with only 19 miles remaining to Kandahar.
The long march from Kabul to Kandahar of the entire column of men, followers, and baggage took 20 days, an average of just over 15 miles/day. The followers alone included nearly 2,200 dhooly-bearers, 4,700 transport men, and over 1,200 servants. Although unhindered by the Afghans, the march proved an historical and remarkable feat of human endurance and organization.
Battle
On the morning of August 31, 1880, the relief force reached Kandahar. For the last part of the trek General Roberts, struck down with fever, had to be carried in a dhooly (though for dignities sake, the general had forced himself upon a horse when within sight of the city).
Ayub Khan’s position
A rugged and precipitous spur separates the Urgundab valley from the Kandahar plain. Both valley and plain link by way of Murcha Pass at the end of the spur, and Babawali Pass cutting through it. The section of the spur from Babawali Pass to its tip has the name Pir Paimal Hill. Behind that spur lies the village of Mazra, around which Ayub Khan had camped. In addition to the spur, the Afghans had other geographic advantages. Directly behind Pir Paimal Hill lay Kharoti Hill, both providing excellent firing positions. Between the hills, deep irrigation channels offered excellent defensive cover.
While General Gough and Colonel Chapman conducted a reconnaissance of the area on the afternoon of the 31st, Afghan regulars and irregulars made a concerted attack on the reconnaissance party. Still, they had garnering valuable information of those Afghan positions. The Afghans pressed the Sikh infantry so hard that elements of the 1st and 3rd brigades received orders to support them.
Battle plan
Armed with that hard-won intelligence, General Roberts decided to attack the following day, the morning of September 1, 1880. The plan called for artillery bombards on Babawali Pass, while the 1st and 2nd Infantry Brigades (3rd in Reserve) would attack the enemy between the Pir Paimal and Kharoti hills, pushing up the Urgundab valley towards Ayub Khan’s main camp at Mazra. Cavalry elements supported by General Primrose’s infantry and artillery covered Murcha and Babawali passes. General Gough's cavalry would move across the Urgundab, so as to reach by a wide circuit the anticipated line of the Afghan retreat.
Battle begins in earnest
Shortly after 9 a.m., the artillery to the right of Picquet Hill began its bombardment of the Babawali pass; the Afghans replied with a three field-gun battery. Before Roberts could push his army forward, Afghan positions in the villages of Mulla Sahibdad on the British right and the village of Gundigan on the British left, had to be cleared.
They had a hard fought battle at Mulla Sahibdad. General Macpherson advancing his 92nd Highlanders and 2nd Gurkhas met determined resistance. Both sides suffered casualties, but the Afghans came off far worse; possibly losing up to 200 men. After the village had been pacified, the brigade pushed towards the southwesterly point of Pir Paimal, constantly harassed by determined Afghan resistance.
While General Macpherson advanced against Mulla Sahibdad, General Baker moved against Gundigan; the 72nd Highlanders and the 2nd Sikh Infantry in the van. Again both sides fought hard; the Afghans holding well-defended positions that only a concerted effort by the attackers could dislodge. The left wing of the 72nd (supported by 5th Gurkhas) finally took the village, while the right wing supported the Sikhs, battling through the orchards between the two villages. As General Baker’s brigade moved forward into the open it came under artillery fire from the extremity of the Pir Paimal hill and massed attacks from Ghazis; Highlanders and Sikhs resolutely repelled the latter.
The two brigades could now together move forward. Macpherson’s brigade moved close around the spur to take the village of Pir Paimal. Having passed the village, the 92nd Highlanders under command of Major White, met with determined resistance south west of the Babawali Pass. Despite reinforcements from Ayub Khan’s main camp at Mazra, Macpherson stormed the position; Major White’s Highlanders in the van supported by the 5th Gurkhas and 23rd Pioneers. Again a determined resistance and steady fire from the Afghans, who fired from the slopes of the Pir Paimal hill, caused many Highlander casualties. But, despite heavy losses, the British dispersed some 8000 Afghans at the point of a bayonet.
While Macpherson’s brigade advanced close under the ridge, Baker’s troops swept wider on the left; Colonel Money having been assigned to take possession of the Kharoti hill. From the northern end of the hill, Colonel Money could see Ayub Khan abandon his camp at Mazra in the face of the advancing forces of Macpherson and Baker.
General Roberts had by now ordered McGregor’s 3rd brigade to Pir Paimal village to where he himself and General Ross (commander of the whole infantry division) planned to move. Here, General Ross, unable to discern the situation, ordered the forward brigades to halt and replenish their spent ammunition. That delay provided Ayub Khan some respite. The British entered the camp at 1 p.m. finding it deserted, save for the smartly abandoned detritus of an army in retreat.
Ayub Khan’s army now rushed in full rout. Although the plan for General Gough’s cavalry to intercept the retreating Afghans failed in practice, the British clearly had achieved a decisive victory.
Aftermath
The Battle of Kandahar brought to a close the Second Anglo-Afghan War. Ayub Khan had been decisively beaten. He had lost the whole of his artillery, his camp, enormous quantities of ammunition and about 1,000 men had been killed. Ayub Khan became a fugitive along with the small remnants of his battered army.
General Roberts left Kandahar on September 9, and marched to Quetta with part of his division. On October 15, at Sibi, he resigned his command, and sailed from Bombay on the 30th, taking sick leave in England. The exploits of General Roberts in Afghanistan greatly boosted his reputation as a skillful and enterprising soldier. Many years later, the government commissioned a statue in Glasgow’s Kelvingrove Park commemorating Robert’s heroic march with the motto Virtute et valore (by Virtue and Courage) inscribed.
The Second Anglo-Afghan War achieved stability in the region, yet the cost of bitter feelings toward the British proved a high price to pay.[6] The new prince, Abdur Rahman Khan, ruled independently without upsetting Calcutta too much. Afghanistan returned to its pre-war role as a neutral buffer state between India and Russia.
Order of battle
Notes
- ↑ Lawrence James, "Raj: The Making and Unmaking of British India" (Little, Brown & Company: 1997), p. 377.
- ↑ James, p. 377.
- ↑ The Second Anglo-Afghan War 1878-1880. "General Roberts' Relief from Kabul to Kandahar." Retrieved May 21, 2008.
- ↑ "General Roberts' Relief of Kabul"
- ↑ "General Roberts' Relief of Kabul"
- ↑ James, p. 378.
ReferencesISBN links support NWE through referral fees
- Collins, James Joseph. Diary of the Second Anglo-Afghan War. 1878.
- Great Britain. Herat: With reference to the British Occupation of Kabul and Kandahar in October 1879. London: Printed at the War Office by Harrison & Sons, 1879.
- James, Lawrence. Raj: The Making and Unmaking of British India. Little, Brown & Company, 1997. ISBN 0316640727
- Ripon, George Frederick Samuel Robinson. Correspondence, Confidential, Official and Private From and to George Frederick Samuel Robinson, Marquis of Ripon: Covering the Whole of the Period During Which he was Viceroy and Governor General of India, April 1880 to December 1884. 1880.
External links
All links retrieved September 22, 2023.
- The Second Anglo-Afghan War 1878-1880.
- General Roberts' Relief from Kabul to Kandahar.
- Order of Battle.
- Kabul-Kandahar Star medal.
- Statue of Roberts at Kelvingrove Park, Glasgow.
Credits
New World Encyclopedia writers and editors rewrote and completed the Wikipedia article in accordance with New World Encyclopedia standards. This article abides by terms of the Creative Commons CC-by-sa 3.0 License (CC-by-sa), which may be used and disseminated with proper attribution. Credit is due under the terms of this license that can reference both the New World Encyclopedia contributors and the selfless volunteer contributors of the Wikimedia Foundation. To cite this article click here for a list of acceptable citing formats.The history of earlier contributions by wikipedians is accessible to researchers here:
The history of this article since it was imported to New World Encyclopedia:
Note: Some restrictions may apply to use of individual images which are separately licensed.

